Left Continue shopping
Your Order

You have no items in your cart

Promotion
Read more
Explore endless possibilities with Auzz Trinklets N Krafts
Currency

Blog / DT Teresa

DT Teresa - All About The Men

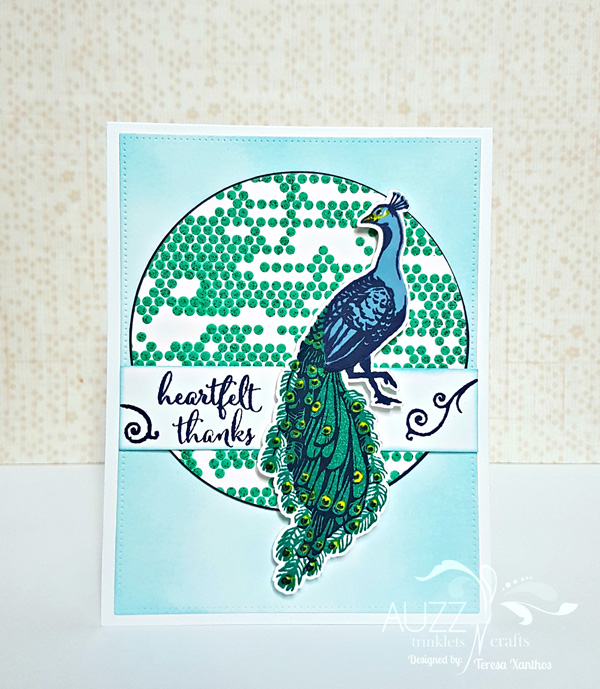
Hello Everyone! Welcome to our month of celebrating All About The Men! I think many of us struggle with creating a masculine themed card and hopefully we can provide you with some inspiration throughout September here on the Auzz Trinklets and Crafts blog. Bold and graphic are elements I think of when it comes to a masculine design. I kept things fairly simple here as the stamp really does all the work for me on this card. This card uses Neenah Classic Crest 110# Smooth Solar White Cardstock for the base which is cut with a paper trimmer at 4 1/4" x 11" and scored with a teflon bone folder at 5 1/2" to make a top folding card of 5 1/2" x 4 1/4".

The Concord & 9th turnabout stamps are a revelation. I used theConcord & 9th Triangle Turnabout stamp on this card and it was so fun to play with. There is a little bit of prep to using these stamps, so be sure to check out the You Tube video they have on their channel to learn what you need to do.
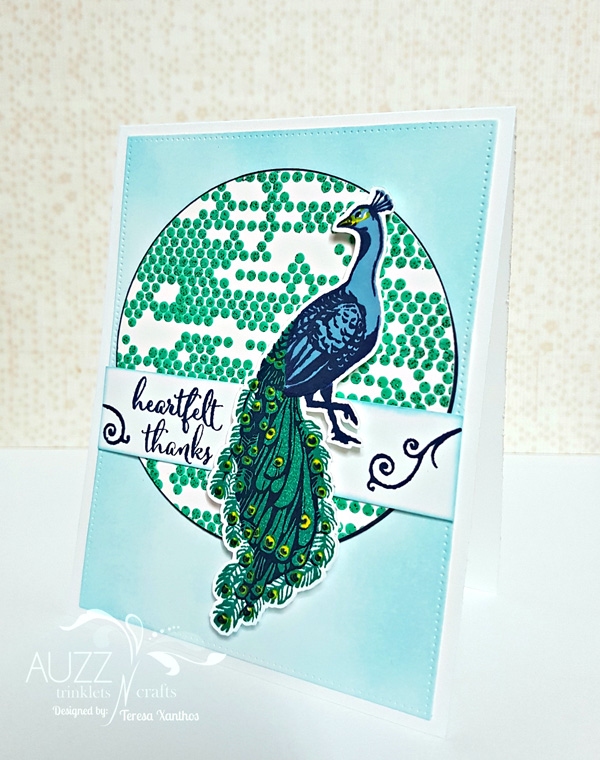
I may have mentioned this before, but for all the fabulous techniques that can be done with Ranger Distress Oxide Inks, I simply love stamping with them! For this background I used Wild Honey (yum!),Peacock Feathers, Faded Jeans and Fired Brick. I stamped with aMISTI onto a 5 1/2" x 5 1/2" Neenah Classic Crest 80# Smooth Solar White Cardstock piece and trimmed it down to
4 1/8" x 5 1/2" to fit the card front, bar a sliver on the right where I placed a strip of Simon Says Stamp 100# Soft Navy Cardstock.
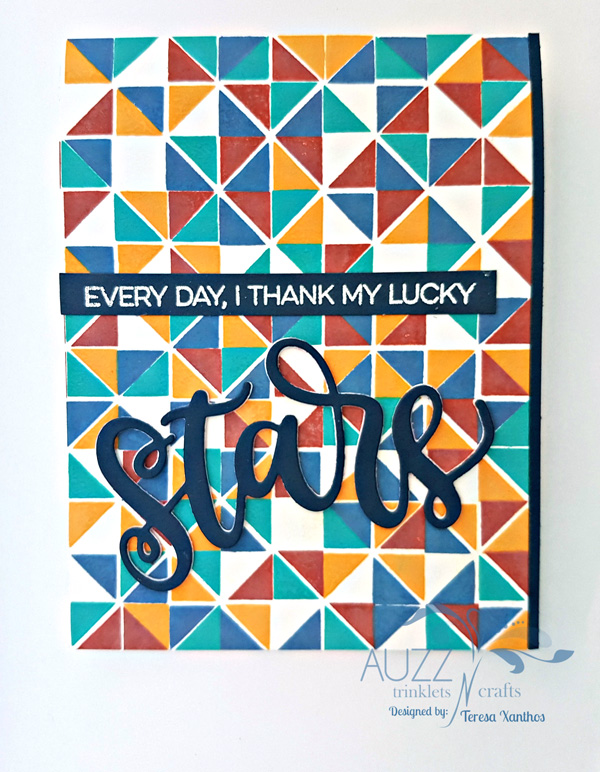
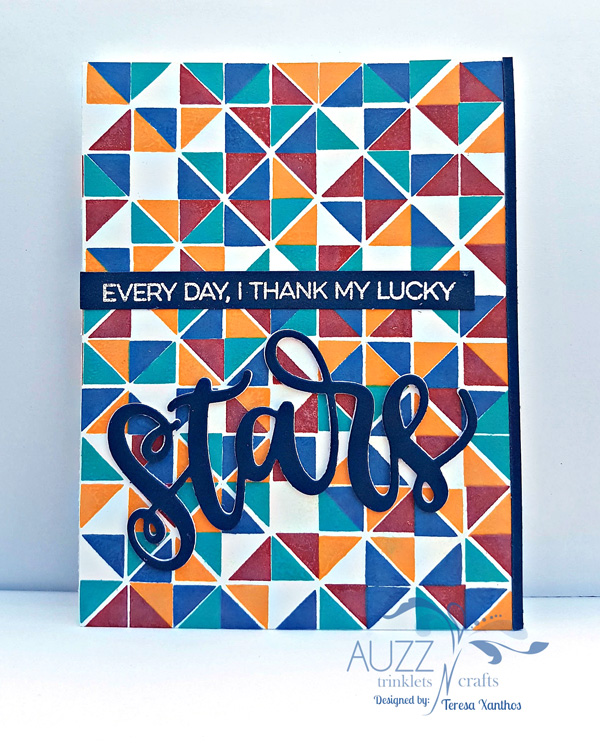
I used the same cardstock to cut a strip for the sentiment and the top piece of the 'stars' word die. The sentiment was stamped in Versamark Ink from My Favorite Things Written in the Stars and heat embossed with Ranger Embossing Powder, White after swiping the cardstock with EK Tools Powder Tool to prep the surface.
I then diecut the word 'stars' with the Sizzix Big Shot Machine fromMy Favorite Things Shining Stars using Neenah Classic Crest 80# Smooth Solar White Cardstock and stacked these together using Ranger Multi Medium Matte, placing the navy piece on top and adhering to the card. I then adhered the sentiment strip above and the card was complete.
Perhaps it is unconventional to have not included some stars on my card, but sometimes unexpected can be fun. What do you think?
Thankyou for following along with me today. If you cannot find the items I have used (listed below) in the Auzz Trinklets and Crafts store, be sure to drop Neha a message via email or Facebook and she will do what she can to order the product in for you.
Happy crafting and have a great day!
Teresa
Products Used:
Read more

DT Teresa - Stencils 2

Hi Everyone!
Today I am sharing another card using a stencil, our theme for this month of June.
This card uses Neenah Classic Crest 110lb Smooth Solar White Cardstock for the base which is cut with a paper trimmer at 4 1/4" x 11" and scored with a teflon bone folder at 5 1/2" to make a top folding card of 5 1/2" x 4 1/4".
I started by taping down a piece of Neenah Classic Crest 110lb Smooth Solar White Cardstock cut at 4 1/4" x 5 1/2" to my work surface withmasking tape to keep in place while I worked (but could be easily removed when finished) and taped down a 6" x 6" Crafter's Workshop stencil Tiny Circles over the top of the cardstock.
I mixed together in a bowl a small amount of Wendy Vecchi Embossing Paste in white with a few drops of Distress Ink in Lucky Clover from a refill bottle and some emerald green glitter. I then used a palette knife to evenly apply the paste to the stencil. Once covered, I removed the stencil and immediately placed it into a basin of soapy water to be washed off later and set the stenciled cardstock aside to dry.
The beautiful image was created using Hero Arts Color Layering Peacock. The peacock was stamped with different colours of Hero Arts mid-tone Shadow Ink. The solid body was stamped with Pool, the tail with Emerald Green, the layered feathers on the body and tail and the legs in Navy and the eyes in the tail and beak were stamped with Lemon Yellow. I diecut the peacock and set it aside.
I then used Tumbled Glass Distress Ink with an ink blending toolto add colour to a piece of Neenah Classic Crest 80lb Solar White Cardstock and diecut it with the rectangle die from My Favorite Things Blueprints 21 and adhered it to the card base with Kokuyo Glue Tape Roller.
Once the stenciled cardstock piece was dry, I diecut a circle from it with a Spellbinders Nestabilities Classic Circles die. I used Simon Says Stamp Cardstock Soft Navy to diecut a circle only marginally larger to tuck behind the stenciled circle piece and adhered both to the cardfront.
The sentiment from Hero Arts Color Layering Poppy was cut apart and positioned to stamp in Hero Arts mid-tone Shadow Ink, Navy, with a Misti Stamping Tool onto a strip of cardstock, along with flourishes from the Hero Arts Color Layering Peacock stamp set.
I diecut multiple copies of the peacock shape and glued them as a stack to create a chipboard-type piece and placed the stamped image on top. I then stuck the sentiment piece to the card and glued the peacock on top before brushing A Wink of Stella, Clear, onto each of the yellow areas for some shimmer.
Thankyou for following along with me today. Please feel free to ask questions if anything needs clarifying. If you cannot find the items I have used (listed below) in the Auzz Trinklets and Crafts store, be sure to drop Neha a message via email or Facebook and she will do what she can to order the product in for you.
Happy crafting and have a great day!
Teresa
Products Used:
Neenah Classic Crest 110lb Smooth Solar White Cardstock
Paper trimmer
Teflon Bone Folder
Masking tape
Wendy Vecchi Embossing Paste, white
Glitter, green
Palette knife
Hero Arts mid-tone Shadow Ink - Pool, Emerald Green, Navy, Lemon Yellow
Tumbled Glass Distress Ink
Kokuyo Glue Tape Roller
Spellbinders Nestabilities Classic Circles, Large
Simon Says Stamp Cardstock Soft Navy
Hero Arts Color Layering Poppy
Misti Stamping Tool
Zig A Wink of Stella marker, Clear
Read more

DT Teresa - Romance 2

Hello! I hope you all enjoyed your Valentine's Day yesterday, whether or not you celebrated the day designated for love!

Today I am sharing a card that fits the bill for Romance, our theme for February here on the Auzz Trinklets and Crafts blog.

This card uses Neenah Classic Crest 110lb Smooth Solar White Cardstock for the base which is cut with a paper trimmer at 4 ¼“ x 11” and scored with a teflon bone folder at 5 ½“ to make a top folding card of 5 ½“ x 4 ¼”.
I chose My Favorite Things Cookie Crumbs and the coordinating My Favorite Things Dienamics set You're the Milk to my Cookie for this project.
I used the sprinkles/hundreds and thousands stamp meant for a cookie and stamped it multiple times onto the card base with Altenew Crisp Dye Ink in Frosty Pink.
The layered frames were die cut from Neenah Classic Crest 80lb Smooth Solar White Cardstock with Simon Says Stamp Stitched Rectangles dies. I lined up the outside die with the third largest die to create the first frame and then used the outside die with the second largest die to create the top frame and adhered them together using 3M Scotch Double Sided Foam Tape and stuck these to the card base with double sided tape.
I cut four milk bottles from Neenah Classic Crest 80lb Smooth Solar White Cardstock and glued them together to create a dimensional piece and did the same with kraft cardstock to create the cookie, using the larger of the two circular dies in the set.
My Heidi Swapp Minc machine then came into action. I foiledHeidi Swapp Minc Sheets using Heidi Swapp Reactive Foil in Light Pink, iCraft Deco Foil in Red and iCraft Deco Foil in Gold. I then used dies from the MFT set to diecut the pieces I needed from the different colours of foil using my Sizzix Big Shot machine. The heart dies came from the Sizzix dies set that coordinate with Tim Holtz's Stampers Anonymous Crazy Thingsstamp set. The foiled pieces left over, I put away for future projects. I used a shim when cutting the lid for the bottle so the debossing was a little deeper and more obvious.
I took the label for the milk bottle and heat embossed the word milkfrom the MFT stamp set using Versamark ink, Hero Arts white embossing powder and Wagner heat tool. Prior to stamping, I used an EK Success Powder Tool on the foil to prevent stray embossing powder from sticking in places I did not want it, then wiped away the powder once the embossing had cooled with a microfibre cloth. I was not sure how the foil would react to the great heat of the tool, but was happy to see that it provided an interesting effect and a wonderful texture. I think I will be using this technique again as it would be perfect for a vintage look.

I glued all the pieces together and placed them onto the card base usingRanger Multi Medium Matte before stamping and heat embossing the sentiment from the MFT stamp set with Hero Arts white embossing powder onto a strip of black cardstock which I adhered with 3M Scotch Double Sided Foam Tape. Again, I used the EK Success Powder Tool prior to stamping on the black cardstock, wiping the powder away with a microfibre cloth after the embossing was done.

I showed this to my husband once I had finished and he asked if he could write in it and give it to me. Ha!

Thankyou for following along with me today. Please feel free to ask questions if anything needs clarifying. If you cannot find the items I have used (listed below) in the Auzz Trinklets and Crafts store, be sure to drop Neha a message via email or Facebook and she will do what she can to order the product in for you.

Happy crafting and have a great day!

Products: Neenah Classic Crest 110lb Smooth Solar White Paper Paper trimmer Teflon bone folder My Favorite Things Cookie Crumbs My Favorite Things Dienamics You're the Milk to my Cookie Altenew Crisp Dye Ink in Frosty Pink Neenah Classic Crest 80lb Smooth Solar White Cardstock Simon Says Stamp Stitched Rectangles dies 3M Scotch Double Sided Foam Tape Double sided tape Kraft cardstock Heidi Swapp Minc machine Heidi Swapp Minc Sheets Heidi Swapp Reactive Foil in Light Pink iCraft Deco Foil in Red iCraft Deco Foil in Gold Sizzix Big Shot machine Sizzix/Tim Holtz dies set Crazy Things EK Success Powder Tool Versamark ink Hero Arts white embossing powder Microfibre cloth Wagner heat tool Ranger Multi Medium Matte
Read more

DT Teresa – All About the Girls 2!

Hello! Today I am sharing my second project for January with the theme All About the Girls.

When I ordered the Honey Bee stamp set Little Pickup from Neha, I knew I had to create with it right away! It kind of screams to be used on a card for a bloke, but the set itself is so versatile with all the sweet additions you can have loaded into the back of the ute. I figured that pink and frills are not for all girls…but (I think) most of us like to receive flowers!

There are words from the Honey Bee Sending You Sentiments stamp set that coordinate with this set which can be used for a celebration, a get well, a heads up on a change of address and on an occasion when you want to lift someone’s spirits.

This card uses Neenah Classic Crest 110lb Smooth Solar White Paper for the base which is cut at 4 ¼“ x 11” and scored at 5 ½“ to make a side folding card of 5 ½“ x 4 ¼”.

I applied Tumbled Glass and Broken China Ranger Distress Inks directly to the top half of the card base with a Ranger Mini Ink Blending Tool to create a sky back ground. I coloured the area in Peeled Paint Ranger Distress Ink that would be seen behind the track.

The hills with tree trunks were die cut with the Lawn Fawn Lawn Cuts Stitched Tree Borders and I also used the coordinating Lawn Fawn Lawn Cuts Grassy Hillside Borders for the foreground of the scene. These pieces were coloured with Shabby Shutters and Peeled Paint Ranger Distress Ink as were the green leaf pieces for the trees. I coloured the tree trunks with a Ranger Distress marker in Gathered Twigs.

On each piece – the sky, hill and two layers of grass, I squirted water using my Ranger Distress Sprayer which left the splotchy texture.

I took the first layering piece with the trees and die cut a track into it for the ute (pickup truck) to move along. The Lawn Fawn Lawn Cuts Slide On Over set also coordinates, however I wanted the track to be a little longer than the die would allow. I placed the piece into the Sizzix Bigshot so that the right side of the die was hanging outside the sandwich of the plates so that it would not be cut.

I then flipped the die around and matched it up with the cut piece and again ensured that the die would not cut at that end by leaving it outside the plates. This enabled me to have a longer track along the card.

I stamped the ute and flowers from Honey Bee Stamps Little Pickup with my MISTI stamping tool in Memento Tuxedo black ink onto X-Press It Blending Card and coloured the ute and flowers with Copic markers. The flowers and ute were then diecut using the coordinating Honey Bee Little Pickup dies.

I chose 'a little pickup' sentiment from Honey Bee Stamps Sending You Sentiments and stamped in Versamark ink using the MISTI stamping tool to assist with placement and embossed with Hero Arts white embossing powder using the Wagner heat tool.

As the ute is a large image, I cut four cardstock discs with the My Favorite Things Surf and Turf dies so that I could secure it in two places. I glued a My Favorite Things Spin & Slide Disc onto two of the cardstock discs with Ranger Multi Medium matte and placed them into the tracks underneath so the Spin & Slide discswere facing up. The other cardstock discs were then adhered onto the other side of the Spin & Slide discs. At this point, both ran freely along the track. I placed them apart so the ute could then be glued to the discs in a sturdy position.

I then adhered this layer to the card base using 3M Scotch Double-Sided Foam Tape and used it also to adhere the first layer of grass in order to give the ute clearance to move along the track. I adhered the final piece directly using Ranger Multi Medium matte and added the single flowers along the bottom of the card.

I finished off the card by diecutting three of the 'Sending you' sentiment from Honey Bee Stamps Sending You Sentiments die set from white cardstock and layered them together, adhering the words to the card base using Ranger Multi Medium matte. With a lick of Zig A Wink of Stella in clear over the sentiment, the card was complete.

Thankyou for following along with me today; please feel free to ask questions if anything needs clarifying. If you cannot find the items I have used (listed below) in the Auzz Trinklets and Crafts store, be sure to drop Neha a message via email or Facebook and she will do what she can to order the product in for you.

Happy crafting and have a great day!

Teresa

Products:

Neenah Classic Crest 110lb Smooth Solar White Paper

Tumbled Glass Ranger Distress Ink Pad

Broken China Ranger Distress Ink Pad

Peeled Paint Ranger Distress Ink Pad

Shabby Shutters Ranger Distress Ink Pad

Ranger Mini Ink Blending Tool

Lawn Fawn Lawn Cuts Stitched Tree Borders

Lawn Fawn Lawn Cuts Grassy Hillside Borders

Gathered Twigs Ranger Distress marker

Ranger Distress Sprayer

Lawn Fawn Lawn Cuts Slide On Over

Sizzix Bigshot

Little Pickup stamps - Honey Bee Stamps

MISTI stamping tool

MementoTuxedo Black ink

X-Press It Blending Card

Copic markers – R02, R14, R24, N0, C0, C1, C4, W5, W7, YR15, YG23, Y06

Honey Bee Stamps Little Pickup dies

Honey Bee Stamps Sending You Sentiments

Versamark ink pad

Hero Arts white embossing powder

Wagner heat tool

My Favorite Things Dienamics Surf and Turf

My Favorite Things Dienamics Spin & Slide Discs

Ranger Multi Medium matte

3M Scotch Double-Sided Foam Tape

Honey Bee Stamps Sending You Sentiments die set

Zig Wink of Stella - Clear Glitter marker

Read more